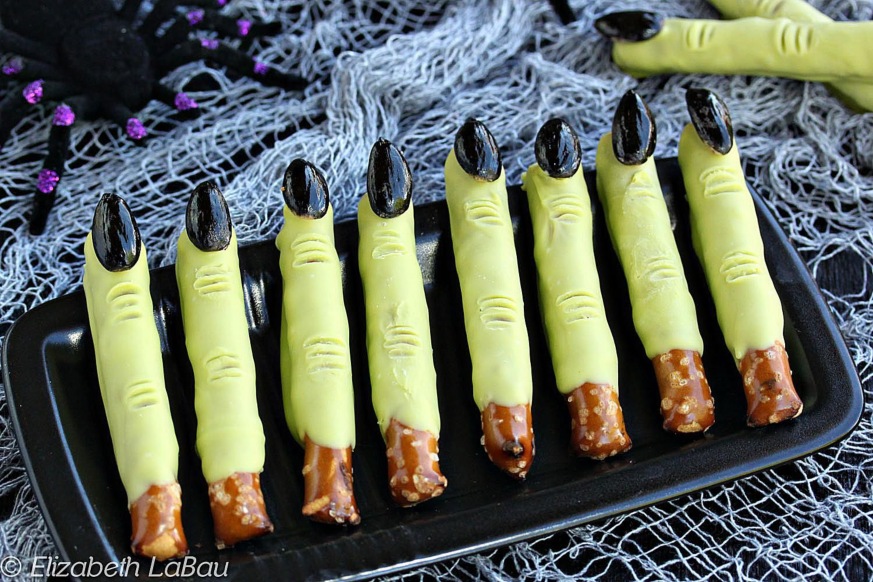
What’s the magical phrase to getting something good to eat this time of year? We’re thinking it goes something like, trick or treat. No doubt, the Halloween season offers plenty of tricks, but there’s plenty of treats too. You just have to know where to look and what to bake! Luckily, we have a few very Halloween inspired delights that are pre-bubbling in our creative caldron. Sorry, make that creative kitchen—we’re not witches. Or are we?
Witch Fingers: Witch fingers or pretzel rods drizzled with melted chocolate and almonds? You decide.
Ingredients
–28 blanched almonds
-1 tube black gel food coloring
-14 large pretzel rods
-12 oz. bright-green candy coating
Recipe
–Use a small food-safe paintbrush to paint the top of each almond with black gel food coloring. (Wear food-safe gloves if you want to avoid getting your fingertips dyed black as well.)
-Set aside on waxed paper or parchment paper to dry while you prepare the rest of the recipe.
-Break or cut each pretzel rod in half.
-Place the green candy coating in a small but deep microwave-safe bowl (or heatproof cup) and microwave in 30-second increments, stirring after every 30 seconds to prevent overheating and burning. Stir and heat until the candy coating is completely melted and smooth.
-Holding a pretzel rod by the unbroken end, dip it in the green coating until almost all of it is covered, leaving about a 1/2-inch section undipped at the top where you are holding it.
-Place the dipped pretzel on the same lined baking sheet you used to dry the black candy-coated almond nails and immediately press one of them on the tip of the pretzel rod that is coated in green candy coating.
–Continue to dip more pretzels and, while you do, keep an eye on the already-dipped pretzels. When the coating has started to dry and is mostly matte but not completely hard, it’s time to add the wrinkles for the knuckles.
-Take a toothpick and hold it perpendicular to the pretzels. Gently roll it across the top to add wrinkles. Make two sets—one set near the fingernail, and one set about halfway down the finger. This will make your witch finger super realistic-looking. If the coating is too melted and sticky when you try, give it a few more minutes to set before trying again.
After all the pretzels have been dipped and decorated, refrigerate the tray for 10 minutes to set the coating completely. After that, the witch fingers can be served on a party tray or be standing up in a mason jar.
Bloody Truffles: These super scary, but super delicious icing covered cake pops will be the hit of the party.
Ingredients
-1 box cake mix
-16 oz. prepared frosting
-1 lb. white candy coating
-48 royal icing weapons (knives, axes, or similar edible weapons)
-1 tube red gel food coloring
Recipe
-Prepare and bake the cake mix according to the directions of the package for a 9×13-inch cake. Once baked, allow the cake to cool completely.
-Crumble the cake into a large bowl and work it with your hands until it is in small pieces.
-Spoon 3/4 of the frosting into the bowl and stir with a rubber spatula until the mixture is well-combined. It should be very moist and hold together if you squeeze a ball of cake between your fingers, but not too wet or greasy. If the cake mixture is still a bit dry, add more frosting to get it to the desired consistency—the exact amount you need will depend on the texture of the cake you started with.
-Using a small cookie or candy scoop, scoop out 1-inch balls of cake and roll between your palms until they are round. You should get about 48 balls from this recipe. Place the cakes balls on a baking sheet covered with parchment or waxed paper, and refrigerate them until firm, at least 1 hour.
-Place the candy coating in a medium microwave-safe bowl and microwave it until melted, stirring after every 45 seconds to prevent overheating.
-Cover a baking sheet with waxed paper.
-Using dipping tools or a fork, submerge a cake ball in the melted candy coating. Remove it from the coating and drag the bottom across the lip of the bowl to remove excess coating. Place the dipped truffle back on the baking sheet. While the chocolate is still wet, firmly press a royal icing knife or axe into the truffle. Repeat until all of the truffles are dipped and decorated.
-Once all of the cake balls are dipped, refrigerate the truffles to set the coating completely, about 20 minutes.
-Take a clean paintbrush and brush some red gel food coloring around the tops of the truffles where the royal icing decorations are.
-These bloody truffles are best served at room temperature and can be stored in an airtight container in the refrigerator for up to a week.
Meatball Monster Sliders: Monsters need protein too—don’t let these meatball ‘monster’ sliders’ size fool you—they’re so good it’s scary!
Ingredients
–24 frozen precooked meatballs
-2 cups spaghetti or pasta sauce
-12 mini whole wheat sandwich buns
-3 tablespoons softened butter
-24 pimento-stuffed olive slices
Recipe
-In a medium saucepan, combine the frozen meatballs with the spaghetti sauce. Bring to a simmer over low heat, stirring frequently. Cook until the meatballs are thawed and well heated, about 6 to 7 minutes. Stir the mixture frequently so it doesn’t burn.
-You may want to add a tablespoon or two of water toward the end of the cooking time if the pasta sauce starts sticking to the pan. When the meatballs are hot, remove the pan from the heat, cover, and set aside.
-Cut the sandwich buns in half and spread softened butter on each side. Toast in a oven or under the broiler until the buns are light golden brown.
-To assemble, place two meatballs, along with some of the sauce, on the bottom of each toasted bun. Top each meatball with a slice of olive, then put the tops of the buns on the meatballs at an angle. You can use a toothpick to hold the whole thing together if you’d like.
-Serve immediately and remind the kids to remove the toothpicks before they dig in!
Check out more fun recipes over at thespruceeats.com.


